Heart Rate Tracking
Monitor your heart rate during workouts for better training insights.
Heart Rate Sources
Treadmill Assistant supports two heart rate sources:
| Source | Accuracy | Convenience |
|---|---|---|
| External HR Monitor | High - chest straps and arm bands provide reliable, continuous readings | Requires separate device |
| Treadmill Grip Sensors | Moderate - affected by grip pressure, sweat, and movement | Built into most treadmills |
External HR Monitors
Bluetooth heart rate monitors (chest straps, arm bands) provide the most accurate readings. They allow continuous monitoring without holding the treadmill handles.
See Heart Rate Monitor Settings for setup instructions.
Treadmill Grip Sensors
Many treadmills have metal contact sensors on the handlebars. These require both hands on the sensors and take 30-60 seconds to stabilize.
Using Treadmill Grip Sensors
Proper Hand Placement
For accurate readings:
- Place both hands on metal sensor pads
- Maintain firm but relaxed grip
- Keep hands relatively still (small movements OK)
- Don't grip too tightly (restricts blood flow)
Waiting for Stable Reading
After placing hands on sensors:
- Takes 15-30 seconds to get first reading
- Another 30-60 seconds to stabilize
- "N/A" shows until stable reading acquired
- Be patient - don't remove hands too soon!
Heart Rate Display
During Workout
On the main screen, the Heart Rate stat card shows:
- Current BPM when receiving data from either source
- "N/A" when no signal or unstable
- Updates every few seconds when stable
After Workout
In History, expanded workout shows:
- Minimum HR - Lowest BPM reached
- Average HR - Mean BPM across workout
- Maximum HR - Peak BPM reached
These sync to your health platform (if enabled).
Heart Rate Stabilization
Treadmill Assistant uses smart stabilization to ensure accurate readings.
Why Stabilization Matters
Treadmill HR sensors can show:
- Wildly fluctuating values initially
- False lows when first touching sensors
- Inaccurate spikes during movement
Stabilization waits for consistent, reliable readings before tracking.
How It Works
- You place hands on sensors
- App monitors incoming HR values
- Calculates standard deviation over time
- When variation drops below threshold, HR is "stable"
- Only then does app start recording min/max values
Configuration
Advanced users can adjust stabilization settings:
- Go to Settings > Advanced Settings
- Find Heart Rate Stabilization section
- Adjust:
- Stability Threshold - How stable readings must be (default: 5 BPM)
- Sample Window - How many readings to analyze (default: 10 readings)
- Max Wait Time - Max wait for stabilization (default: 60 seconds)
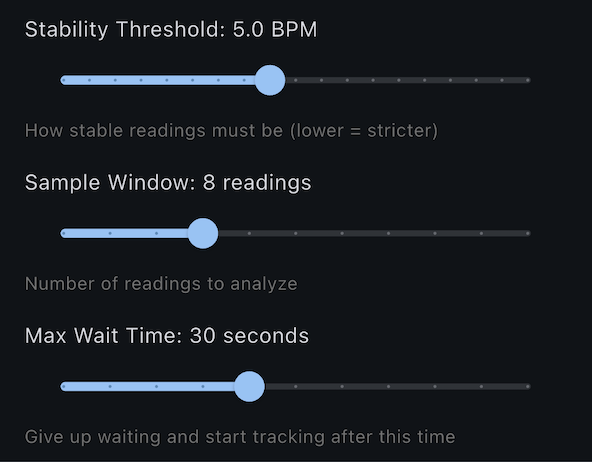
Default Settings Work Well
Most users should keep default settings. Only adjust if you have specific needs.
Minimum and Maximum Tracking
When Tracking Starts
Min/max HR only tracked after stabilization:
- Prevents false lows from initial erratic readings
- Ensures accurate extremes
- More reliable data for training analysis
Continuous Tracking
Once stabilized:
- Minimum updates if HR goes lower
- Maximum updates if HR goes higher
- Average calculated from all stable readings
If Never Stabilizes
If hands never stay on sensors long enough:
- Min/max show "N/A" in history
- Average shows "N/A"
- Workout still saved (just without HR data)
Heart Rate Training Zones
Treadmill Assistant can display your current HR zone (1-5) directly on the heart icon during workouts, and track time spent in each zone.
Requires Health Integration
HR zones require health integration with age data. On iOS, this means Apple Health with Date of Birth permission. On Android, enter your date of birth in Settings > Health Connect > Health Profile.
How Zones Work
Your maximum heart rate is calculated using the standard formula:
Max HR = 220 - your age
For example: Age 35 → Max HR = 185 BPM
The five standard training zones are:
| Zone | % of Max HR | BPM (Age 35) | Purpose |
|---|---|---|---|
| Zone 1 | 50-60% | 93-111 | Recovery, warmup |
| Zone 2 | 60-70% | 111-130 | Fat burning, base fitness |
| Zone 3 | 70-80% | 130-148 | Aerobic endurance |
| Zone 4 | 80-90% | 148-167 | Lactate threshold, performance |
| Zone 5 | 90-100% | 167-185 | VO2 max, sprints |
Enabling HR Zones
- Enable Apple Health integration in Settings > Apple Health (required)
- Grant age permission when prompted (or go to iOS Settings > Privacy & Security > Health > Treadmill Assistant)
- Go to Settings
- Find Heart Rate Zones toggle
- Enable it
When you first enable HR zones, the app will request access to your Date of Birth from Apple Health.
- Enter your date of birth in Settings > Health Connect > Health Profile
- Go to Settings
- Find Heart Rate Zones toggle
- Enable it
Age Data Required
HR zones will not work without age data. On iOS, Apple Health integration and Date of Birth permission are required. On Android, enter your date of birth manually in health settings.
Privacy
Your date of birth is only used locally to calculate zones. It is not transmitted anywhere.
During Workout
When HR zones are enabled:
- The heart icon shows your current zone number (1-5) overlaid in white
- Zone updates in real-time as your heart rate changes
- If HR is below Zone 1 (<50% max), no number is displayed
- Zone time is tracked only while the treadmill is running (not during countdown or pauses)
Zone Distribution in History
After a workout with zones enabled, the expanded history view shows:
- Zone Progression Timeline - A horizontal bar showing zone segments in chronological order
- Color-coded segments - Each segment is colored by zone (blue for Z1, green for Z2, etc.)
- Pause gaps - Gray segments showing when the workout was paused
- Zone breakdown - Time spent in each zone with percentages (e.g., "Z2 Fat Burn: 12:30 (45%)")
The timeline provides a visual story of your workout intensity over time, making it easy to see:
- How quickly you reached your target zone
- Whether you maintained consistent intensity
- How much time was spent in each zone
- When and for how long you paused
Zone Tracking During Pauses
Zone time is only accumulated while the treadmill is actively running. Pause periods appear as gray gaps in the timeline and don't count toward your zone totals.
Troubleshooting Zones
No zone number showing:
- Ensure HR Zones is enabled in Settings
- Check that Date of Birth is available (Apple Health on iOS, Health Profile on Android)
- Verify heart rate is being detected (needs >50% of max HR to show Zone 1+)
Zone calculation seems wrong:
- Verify your Date of Birth is correct
- The 220-age formula is an estimate - individual max HR may vary
No Date of Birth permission (iOS):
- Go to iOS Settings > Privacy & Security > Health > Treadmill Assistant
- Ensure "Date of Birth" is enabled under Read access
Date of Birth not set (Android):
- Go to Settings > Health Connect > Health Profile
- Enter your date of birth
Using Zones for Training
Zone 1-2 (50-70%): Easy recovery runs, warmups, cooldowns
Zone 3 (70-80%): Steady-state runs, building aerobic base
Zone 4 (80-90%): Tempo runs, improving lactate threshold
Zone 5 (90-100%): High-intensity intervals, sprints (use sparingly)
Troubleshooting Heart Rate
No Heart Rate Showing
Problem: HR shows "N/A" during workout
Possible causes:
- Hands not on sensors
- Sensors dirty/not working
- Too much movement
- Treadmill doesn't have HR sensors
Solutions:
- Place both hands firmly on handlebar sensors
- Clean sensors with damp cloth
- Keep hands still for 30-60 seconds
- Verify treadmill has HR capability
Erratic Readings
Problem: HR jumping around wildly
Solutions:
- Keep hands still
- Don't grip too tightly
- Ensure good contact with sensors
- Wait longer for stabilization
- Adjust stabilization threshold in Settings
HR Never Stabilizes
Problem: Always shows "N/A", never gets a reading
Solutions:
- Increase stabilization timeout (Settings > Advanced)
- Check treadmill sensor functionality
- Try different hand positions
- Ensure sensors are clean and dry
HR Seems Inaccurate
Problem: Readings seem wrong (too high or low)
Solutions:
- Treadmill sensors are less accurate than chest straps
- Compare with manual pulse check
- Try different grip positions
- Clean sensors thoroughly
- Consider this normal sensor variance
Improving Heart Rate Accuracy
Best Practices
- Clean sensors regularly - Sweat and oil reduce accuracy
- Proper grip - Firm but not tight
- Minimal movement - Keep hands steady
- Both hands - Don't use just one sensor
- Patience - Allow time for stabilization
When to Check HR
- At start of workout (baseline)
- During steady-state portions (for zone training)
- At peak intensity (max HR)
- During cooldown (recovery rate)
Limitations
Treadmill handlebar sensors:
- ✅ Good for general monitoring
- ✅ Useful for training zones
- ⚠️ Less accurate than chest straps
- ⚠️ Require hands on bars (limits natural running)
- ⚠️ Can be affected by sweat, grip pressure
For professional training, consider dedicated HR monitors.
Heart Rate and Calorie Estimation
Experimental Feature
HR-based calorie estimation is a new, experimental feature. Results may vary between individuals.
With Premium and a Bluetooth HR monitor connected, Treadmill Assistant can estimate calories burned using your heart rate data. This provides a more personalized calorie figure than treadmill-reported values alone.
Requirements
- Premium subscription
- Bluetooth HR monitor connected (chest strap or arm band)
- Health profile with biological sex, weight, and date of birth filled in
How It Works
The app uses an established exercise science formula (Keytel et al., 2005) that factors in your heart rate, age, weight, and sex to estimate energy expenditure during exercise. This approach accounts for your individual effort level rather than relying solely on distance and speed.
What You See
When HR-based estimation is active:
- Primary value: HR-estimated calories (based on your actual heart rate)
- Secondary value: Treadmill-reported calories (shown for reference)
If HR data is unavailable (no monitor connected, or signal lost), the app falls back to the treadmill's calorie value.
Enabling HR Calorie Estimation
- Set up your health profile (sex, weight, date of birth)
- Connect a Bluetooth HR monitor in Settings > Heart Rate Monitor
- Enable HR zones in Settings
- HR-based calorie estimation activates automatically during workouts
Next Steps
- View your stats - Understand HR min/avg/max
- Health integration setup - Sync HR data
- Tips & Tricks - Advanced HR training strategies
HR issues? Check Troubleshooting.